
Short answer
What is the slump test of concrete and what does it tell you? The slump test fills a steel cone with fresh concrete in three layers, lifts the cone, and measures how far the heap sinks. IS 1199 (Part 2):2018 uses it as a check of consistency, which is how stiff or fluid a mix is. It does not measure strength, and IS 456 gives no single good slump, only suggested ranges for placing conditions.
On this page (11)
- What is the slump test?
- What apparatus does it need?
- How is the test done?
- What are true, shear and collapse slumps?
- What does IS 456 say about a good slump?
- What does the slump number not tell you?
- What should I ask for on pour day?
- What mistakes should I avoid?
- Frequently asked questions
- Related guides
- Sources
“What is a good slump?” is one of the most searched concrete questions, and it has no single answer. Slump is a measure of how stiff or fluid a fresh mix is. This page explains how the test is done under IS 1199 (Part 2):2018, what the number does and does not tell you, what IS 456 actually says about workability, and what to ask for on pour day. It prints no mix ratio and gives no advice on adding water. The test is done by the engineer, the site supervisor or a trained technician. The owner’s job is to make sure it is done, recorded and acted on.
What is the slump test?
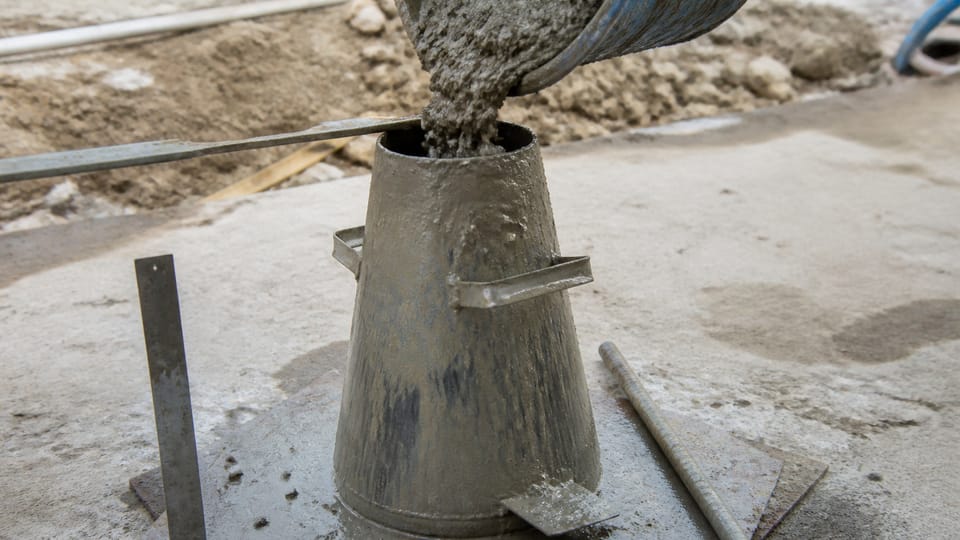
The test measures the consistency of fresh concrete. IS 1199 (Part 2) says the consistency tests “may be treated as synonymous to workability tests”. In the slump test, a metal cone is filled with concrete, the cone is lifted straight up, and the distance the concrete sinks is measured. A stiff mix barely sinks; a fluid mix sinks a lot.
The standard’s limits are worth knowing:
- It applies to consistency corresponding to slumps between 10 mm and 210 mm; outside that range another method should be considered (clause 4.3.1).
- It does not apply to foam concrete, no-fines concrete or concrete with a nominal maximum aggregate size over 40 mm unless the larger pieces are screened out (clause 4.1).
- The same part also describes other consistency tests (Vee Bee, compacting factor, degree of compactability and flow table) for mixes outside the slump range. Slump flow for self-compacting concrete is in Part 6.
What apparatus does it need?
IS 1199 (Part 2), clauses 4.3.2.1 to 4.3.2.9:
| Item | What the standard says |
|---|---|
| Mould | Metal, at least 1.6 mm thick, smooth inside; 200 mm base diameter, 100 mm top diameter, 300 mm high (each with a tolerance of 2 mm); open at both ends; two handles; foot pieces or clamps |
| Tamping rod | Steel, circular, 16 mm diameter and 600 mm long (with small tolerances), rounded ends |
| Base plate | Rigid, flat, non-absorbent and smooth |
| Rule | Graduated from 0 to 300 mm at intervals not over 5 mm |
| Other | Square-bladed shovel, a non-absorbent tray, a scoop and a timer accurate to 1 s |
The CPWD Specifications (Appendix D) still describe an older procedure (four layers, one rounded rod end, two minutes from sampling), unlike IS 1199 (Part 2):2018. Use the 2018 steps below; the cone has to be the standard cone, not an improvised one.
How is the test done?
The steps below are from clause 4.3.3, and the engineer follows the standard’s text on site.
- The sample is taken as in IS 1199 (Part 1) and remixed. Part 1 recommends starting the slump test within 5 minutes after the final portion of the sample is taken.
- Dampen the mould and the base plate with a moist cloth, and place the mould on the rigid, level base plate, free from vibration and shock.
- Fill the mould at once in three layers, each about one-third of the mould height when compacted, holding the mould firmly by standing on the foot pieces.
- Compact each layer with 25 strokes of the rod, spread evenly. The strokes in the second and top layers just penetrate the layer below.
- Heap the top layer above the mould before tamping, top up if it sinks, then strike it off level with a sawing and rolling motion.
- Lift the mould straight up in 5 seconds, with a tolerance of 2 seconds, with no sideways or twisting motion.
- The whole operation, from the start of filling to lifting the mould, is done without a break within 180 seconds.
- Measure the slump straight away: the mould height minus the highest point of the slumped concrete, read to the nearest 5 mm.
What are true, shear and collapse slumps?
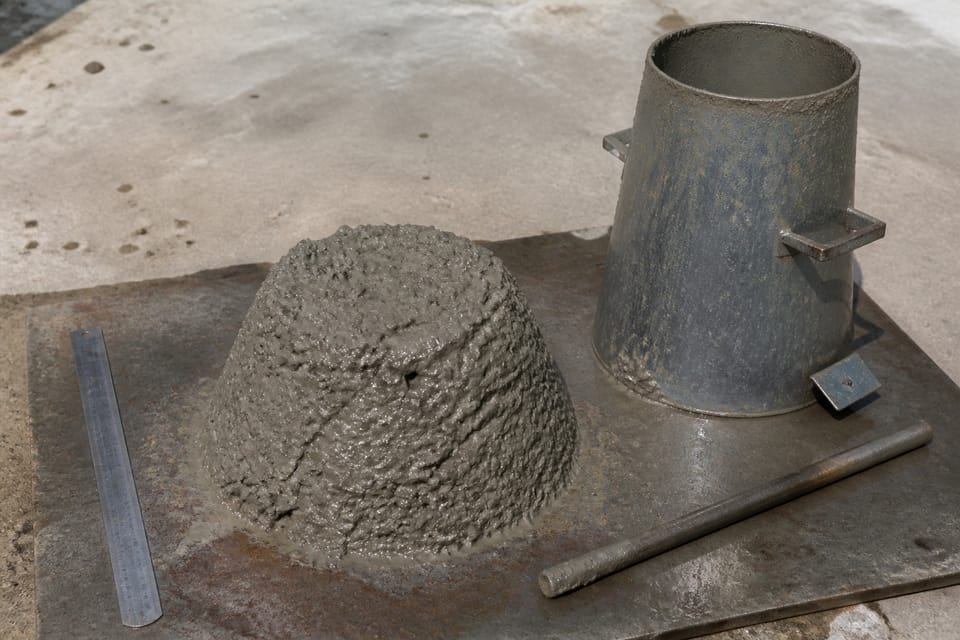
IS 1199 (Part 2), clause 4.3.4 and Fig. 3, gives three outcomes. A true slump, where the concrete stays substantially intact and symmetrical, is the only valid result. If the heap shears (part of it slides off) or collapses, take another sample and repeat the whole test. If two tests in a row shear or collapse, the standard says to report the test as invalid, because the concrete lacks the plasticity and cohesiveness for the slump test to be suitable. Record the shape, not just the number.
What does IS 456 say about a good slump?
Clause 7.1 of IS 456:2000 says the mix should be “of adequate workability for the placing conditions of the concrete” and that it can properly be compacted with the means available. It then gives “suggested ranges of workability”, measured per IS 1199, in a table by placing condition. It gives no single slump for a house.
| Placing condition (as printed) | Degree of workability | Slump suggested (mm) |
|---|---|---|
| Blinding concrete; shallow sections; pavements using pavers | Very low | None given: see 7.1.1 |
| Mass concrete; lightly reinforced sections in slabs, beams, walls, columns; floors; hand placed pavements; canal lining; strip footings | Low | 25 to 75 |
| Heavily reinforced sections in slabs, beams, walls, columns | Medium (IS 456 prints both Medium ranges under one heading) | 50 to 100 |
| Slipform work; pumped concrete | Medium | 75 to 100 |
| Trench fill; in-situ piling | High | 100 to 150 |
| Tremie concrete | Very high | None given: see 7.1.2 |
For very low workability where strict control is necessary, clause 7.1.1 says the compacting factor is more appropriate than slump, and for very high workability, clause 7.1.2 says flow is appropriate. These are suggested ranges for the engineer, and the mix specification for your house says the slump that applies. Do not take a figure from a website or from a neighbour’s pour. The CPWD Specifications group some of these conditions differently from IS 456, which is another reason to ask the engineer.
What does the slump number not tell you?
- Strength. Slump is a consistency check. Strength is checked by cubes: see concrete cube test: how cubes are made, tested and read.
- Cement content or mix proportions. Slump alone cannot show which mix was used.
- Whether water was added. IS 456 clause 8.2.7 warns against overworking the surface and adding water or cement to aid finishing, because the resulting laitance has impaired strength and durability. See water-cement ratio: why extra water weakens concrete.
- Everything about the placing. IS 456 clause 10.3.2 says “Workability should be checked at frequent intervals (see IS 1199)”, with no frequency given. The engineer sets how often.
What should I ask for on pour day?
This is practice, unless a clause is named.
- Agree with the engineer beforehand whether a slump test will be done, who does it, and the slump or workability the mix specification states.
- For ready-mix, ask for the supplier’s delivery record, which includes the estimated slump (IS 4926 clause 10.2.1.4). IS 4926 clause 6.2 allows a slump tolerance of 25 mm or one-third of the specified value, whichever is less, for ready-mixed concrete at acceptance. See ready-mix vs site-mix concrete: which suits a house.
- Note the arrival time and test the first load and any load that looks different.
- Have the test done on a flat, non-absorbent base, with the standard cone, by the engineer, the supervisor or a technician.
- Record the figure with the load, the date and the time, and compare it with the specification.
- If the figure is outside the specification, do not pour until the engineer and the supplier decide. IS 4926 clause 10.2.1.6 says no additional water beyond what is needed for the specified workability is added to the truck drum before discharge unless the purchaser asks for it and signs for it.
- Take the cubes from the same load and keep the slump record with the cube results and the delivery slips.
What mistakes should I avoid?
These are practice, not code rules.
- Asking “what is a good slump” and expecting one number for all work.
- Treating slump as strength.
- Adding water because a load looks stiff.
- Testing a sample that does not represent the load, or on a tilted or absorbent surface.
- Using an improvised cone, or a rod that is not the standard size.
- Repeating the test and keeping only the best figure.
- Ignoring sheared or collapsed slumps.
- Not recording the figure, the time and the load.
Frequently asked questions
What is a good slump for a slab?
IS 456 clause 7.1 gives suggested ranges by placing condition, not one figure for a slab. Your mix specification and engineer give the slump for your pour.
Does a higher slump mean stronger concrete?
No. Slump measures consistency, not strength. Strength is checked by cubes.
Is the slump test needed only for ready-mix?
No. Any concrete has a consistency. For ready-mix the supplier’s records give an estimated slump, and the engineer decides how often a site test is done.
Can I add water if the slump is low?
Do not add water on your own. Ask the engineer first. The mix is designed for a set water-cement ratio, and in practice extra water weakens it.
How long does the slump test take?
The standard requires the whole operation from filling to lifting the cone within 180 seconds. IS 1199 (Part 1) recommends starting within 5 minutes after the final portion of the composite sample is obtained.
Related guides
- Concrete cube test: how cubes are made, tested and read
- Water-cement ratio: why extra water weakens concrete
- Ready-mix vs site-mix concrete: which suits a house
This guide is general information. Read the disclaimer. Your structural engineer decides the mix and the workability for your house.
Sources
- IS 1199 (Part 2):2018, Fresh Concrete: Methods of Sampling, Testing and Analysis, Part 2 Determination of Consistency of Fresh Concrete (first revision): clauses 1, 4.1, 4.3.1 to 4.3.5, Figs 1 to 3 (page images read). BIS lists it as in force, valid to 2028-11-30.
- IS 1199 (Part 1):2018, Part 1 Sampling of Fresh Concrete: clauses 6.1 and 6.3 (page images read).
- IS 456:2000, Plain and Reinforced Concrete: clauses 7.1, 7.1.1, 7.1.2 and its workability table, 8.2.7 and 10.3.2 (page images read). BIS lists it as in force, valid to 2030-07-12.
- IS 4926:2003, Ready-Mixed Concrete: clauses 6.2 and 10.2.1.6 (page images read). BIS lists it as in force, valid to 2027-04-30.
General information only. It is not a structural design or professional advice. Ask a licensed structural engineer or architect to check your plans and site.